Showing posts with label UTEE. Show all posts

Tuesday, 16 September 2014

A little Surprise

Some of you may remember that one of the Facebook groups I am in does a gift exchange occasionally.
The Autumn exchange was set over the summer and I was very lucky to be drawn to get a gift from the supremely talented Bev who does a wide range of jewellery skills but is stunning at beading. How she uses such tiny beads is beyond me.
One morning the postman brought a small box.......soooooooo exciting
And this is what was inside


this stunning small box all made from tiny seed beads with a little lid that I gently opened to find a pair of the most incredible earrings
The detail is stunning, the workmanship quite amazing - even these photos also taken by Bev are superb

I have made for the lovely Stacey who told me she wasn't into hearts and flowers and fussy; she loved lots of colours but blues, teal and turquoises were her favourites.
So I decided to go right back to my jewel enamel roots and create a colour gradation from light turquoise through to deep teal. 


yes you can see some hearts....after reading her message again I made a few more roundels and have kept the hearts for another project


I used these tiny roundels for charms which I added to a chain along with a quirky selection of metal charms.


a close up of the charms


I also poured some large hemispheres to make a pendant for a necklace


I poured  two sets so that I had a choice and then decided I quite liked a mixture


All the gifts are being photographed and uploaded to our group website mid September

This is such a lovely thing to do because we all have different talents and use such a variety of media

I expect we will do it again for Christmas


Friday, 1 August 2014

Strawberries and Cream - a Summer Project

Strawberries and Cream - a summer project


As part of a summer challenge for a Facebook jewellery making group I decided to create a fully loaded bracelet and charm pendant representing summer strawberries.
I have two lovely strawberry moulds and numerous leaf moulds which work well and I wanted to create hand made dipped beads in a clotted cream colour.
a home made mould

this is a Martha Stewart mould


To create the berry colour I used  Diamond Clear with two reds - Cosmic Shimmer's Berry Red and Crafty Notions Ruby Red


because it was quite time consuming to create a batch of charms I needed to keep turning down the heat to stop the mix going too orange
the small mould poured 

finished small berries
    I also poured the large strawberry


the finished strawberries
Next I created the leaves using Crafty Notions Peridot and Diamond Clear
Martha Stewart moulds
completed leaves


To make the beads I colour mixed a clotted cream colour using Diamond Clear with a small amount of Ranger's UTEE white and a sprinkle of Cosmic Shimmer's Light Gold


colour mix for beads

I played around with this until I got a slightly lighter colour than I needed - knowing it would darken with the heat


To make hand dipped beads you need a head or eye pin and then dip the finding in repeatedly, building up layers. You need to gently rotate the pin to make a round shape although the slightly imperfect ones have an organic feel. To make sure the colour is consistent I dipped each pin in turn with each layer building rather than making  a complete bead each time. 


just dipping the end of the eye pin into the mix


swirling gently to get a good shape


third dip


all lined up ready for the final dip

completed beads


the completed bracelet elements
the finished pendant elements

Finally I assembled the charm bracelet and created the charm pendant 

a close up of the bracelet


I think this has a real feel of those long summer days!


Tuesday, 15 July 2014

Using Texture Sheets, Treads and Mats

UTEE jewel enamel is beautiful with a glossy well polished surface on a cabochon especially if you have added a little clear to your mix to give that added depth - it is almost as if you can see into the heart of the cabochon.


But sometimes you want to add texture - perhaps you are struggling with heat polishing or you have used alcohol inks and ended up with lots of bubbles or you just want to include a lovely pattern.


This is where texture mats and sheets come into their own.
There are so many textures on the market but for jewel enamel you need to make sure that the sheet can take the heat and that there is a decent depth to the texture. You rarely get fine detail with a pour although it is always worth trying with a little scrap because you never know what surprising results you can get from the most unlikely looking texture.
Helen Breil who works with polymer clay produces some wonderfully detailed sheets - some are too fine for UTEE but others have deep swirls that will give a great effect
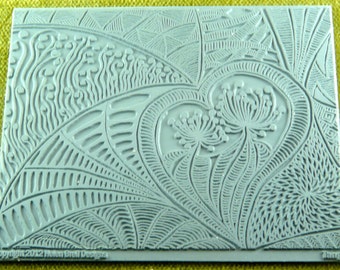
a beautiful Helen Breil texture mat

Karantha who produce brilliant moulds also do a stunning range of texture mats made of very durable red rubber. Again choose carefully to maximise the effect
a Karantha texture sheet

Lisa Pavelka is well known for her textures which look stunning in jewel enamel

      these super textures are from Lisa Pavelka

Have you discovered Ranger's Texture Treads? They are thick black rubber sheets that have a look of being made from car tyres! They are designed especially for UTEE jewel enamel and have very deep texture. Each sheet is split into two - there will be an embossing side and a debossing side - one pattern going in and one going out. So use scrap to try which suits your project best.
you can see quite clearly the two sides of the sheet

Often when you use a texture sheet you will get a matte finish on the raised texture which you can heat polish. If you do decide to polish be very carful - too much heat or too long in one place with the gun and you will lose that lovely surface. Why not highlight the texture with mica powder gently rubbed over the surface with your finger or use gliding wax/gleams rubbed in. Once set you can buff these up to give a great shine.


I really like the way Leonie Pujol uses a texture sheet to pour onto - have a look at this youtube clip

I have written a blog post about pouring onto a texture sheet to create a suncatcher and you will see in detail how to use a cutter to pour into. The choice is yours - pour out and press the cutter into the UTEE or pour directly into the cutter.


A search on Google will get you plenty of images and tutorials plus super blogs about creative people experimenting with UTEE and texture sheets. However not many people will be using this for jewellery which is what I do.

If you are careful you can use rubber stamps ( remember the UTEE is very hot  so perhaps don't use your favourite stamp). I have also successfully used clear stamps to gently impress the surface of a poured bezel.


I think perhaps the simplest but most effective way I have used texture sheets it to create simple pendants which I strung onto seed beads or cord with either a stick on bail or with a large hole.
I use a multi temp soldering iron to melt my holes.


Thursday, 26 June 2014

Using up scrap and exploring Stellar Flash


I am going to a Bead Meet on Saturday and leading a session on UTEE jewel enamel using the melt pot so I have been playing with a few different techniques.
I always end up with quite a large pot of scrap enamel in a gunge colour and have been wondering how to use it up. I also have a new cabochon mould with a variety of different sized cabochons so I thought I would try out the mould and see if I could use up the scrap.
First of all I wanted to try out a new texture sheet so I poured the mix into a leaf shaped cutter laid onto the sheet. I rubbed Versamark onto the cutter as a release agent which works very well.
the scrap mix poured into a cutter on a texture sheet with added gleams
I have used stellar flash in the past but not really been impressed with the results however this time I decided to sprinkle to flash into the mould before pouring a dark colour over the top.
My scrap gunge colours ranged from a murky grey through to a red tinged brown with some dark steel thrown in too.  By adding some scrap to a larger amount of diamond clear and a small amount of navy blue alcohol ink I was able to produce a colour mix that was more translucent than the scrap with an even dark colour which showed up the stellar flash well.
I created a few cabochons including a dinky pair of earrings with a definite opal look about them.


I really like these earrings which are about 8mm
Add caption
I have also been playing with  a three hemisphere mould which has slits for headpins or wire and produces a pendant.

Here are three different pours using this mould - I have used the scrap and stellar flash mix  plus a faux lapis look with gold sprinkled on and then heat polished carefully and one of the black metallics with added bronze. I quite like the effects produced


I used up the last of the scrap mix with a lovely tear drop shaped mould